
Blog
How to Double Crochet: The Ultimate Beginner’s Guide
Double crochet (abbreviated as dc) is one of the most essential stitches every crocheter needs to learn. It’s taller than single crochet, works up quickly, and creates a fabric that’s flexible yet sturdy, making it perfect for everything from cozy blankets and stylish sweaters to lacy shawls and classic granny squares. If you’ve mastered the chain stitch and want to take your crochet skills to the next level, double crochet is the stitch you’ll use again and again.
In this guide, you’ll learn exactly how to double crochet step by step, with clear photos and a video tutorial to guide you every stitch of the way.
TL;DR: Double crochet is a tall, versatile stitch that’s essential for beginners. Yarn over, insert the hook, pull up a loop, then work off the loops in two stages. With a worsted weight yarn and 5 mm hook, you can master it in one sitting.
Quick definition: Double crochet (dc) is a basic crochet stitch that involves a yarn over before inserting the hook into a stitch. You then work off the three loops on your hook in two steps: first through two loops, then through the remaining two loops. This creates a stitch about twice as tall as single crochet, giving your fabric a light, airy drape.
Materials You’ll Need
Gather these basic supplies before you begin:
-
Yarn: Medium or worsted weight yarn (category 4) is ideal for beginners. Choose a smooth, light-colored yarn to see your stitches clearly. Dark or textured yarns hide individual stitches and make learning harder.
-
Crochet hook: A 5 mm (US size H-8) hook pairs well with worsted weight yarn. Check the yarn label for the recommended hook size.
-
Scissors: For trimming yarn ends.
-
Tapestry needle: For weaving in loose ends when you finish your project.
-
Stitch markers (optional): Helpful for marking the beginning of a row or round.
Quick tip: If your stitches feel too tight, switch to a slightly larger hook. If they’re too loose, try a smaller size. This adjustment can dramatically improve the look of your fabric.
US vs. UK Terms—Important!
Before you start, know this: The stitch called double crochet in US terminology is called treble crochet (tr) in UK terminology. If you’re following a UK pattern and it says “double crochet,” it’s actually a US single crochet. Always check which system your pattern uses to avoid confusion.
This tutorial uses US terminology throughout.
How to Double Crochet: Step-by-Step Instructions
Below are the core steps for working the standard double crochet stitch. We’ll start with the setup, move through the stitch itself, and then cover how to work subsequent rows.

Step 1: Make a Slip Knot and Foundation Chain
Before you can double crochet, you need a foundation to work into.
-
Make a slip knot: Loop the yarn around your fingers, pull a strand through with the hook, and gently tighten so the knot slides freely on the hook. This anchors your work.
-
Chain your foundation: Yarn over (wrap the yarn from back to front over the hook) and pull through the loop on the hook. Repeat until you have the number of chains your pattern calls for—or make at least 15 chains for practice.
Important: For double crochet, you need to add extra turning chains at the end. Most patterns call for chain 3 (counts as the first double crochet), so you’ll skip those chains when you start your first stitch. For example, if you chain 15, you’ll make your first dc into the 4th chain from the hook.
Step 2: Yarn Over
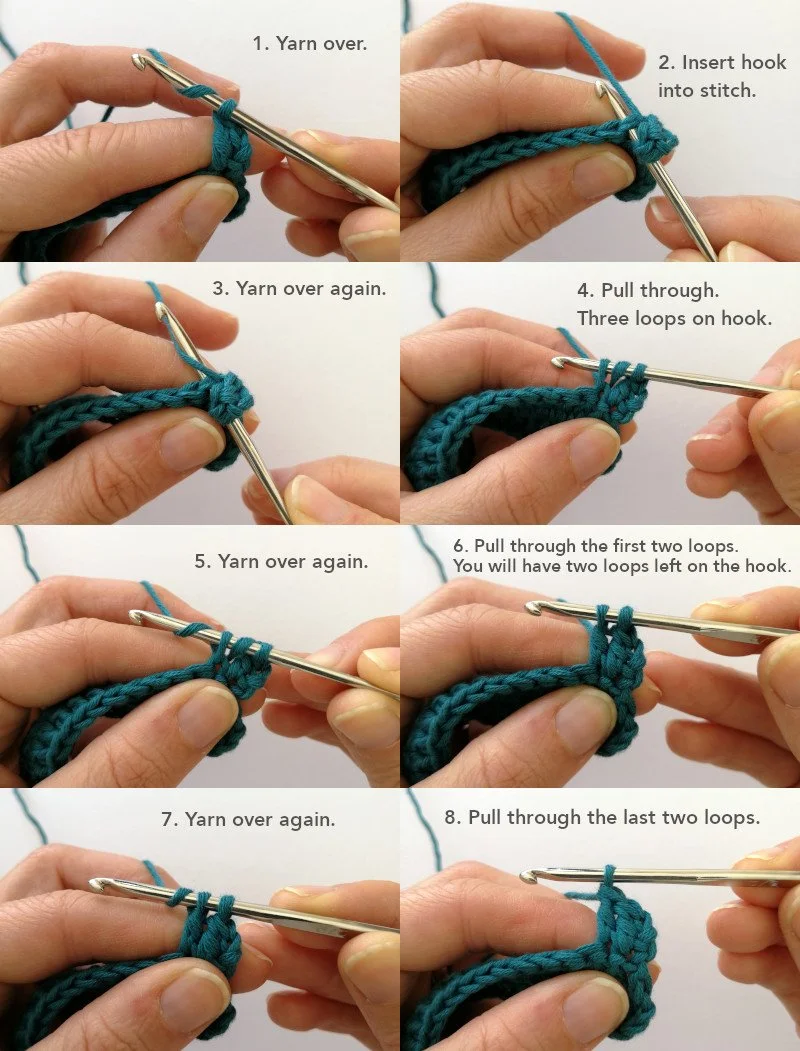
Wrap the yarn over your crochet hook from back to front. Do this before inserting the hook into the stitch. This is the first “yarn over” (yo) that distinguishes double crochet from single crochet.
Step 3: Insert Your Hook into the Stitch
If you’re working into a foundation chain, skip the first three chains closest to the hook and insert your hook into the fourth chain from the hook. Go under the top two loops that form a “V” shape. Working under both loops gives you a neat, even stitch.
If you’re working into an existing row of stitches, insert your hook under both top loops (“V”) of the next stitch.
Step 4: Yarn Over and Pull Through
Yarn over again, then pull the yarn back through the stitch you just entered. You’ll now have three loops on your hook.
🧶 Pro Tip: Keep your tension relaxed here. If your yarn is pulled too tight, it’s hard to draw through smoothly. Practice finding a comfortable, consistent tension.
Step 5: Yarn Over, Pull Through the First Two Loops
Yarn over again, then pull the yarn through the first two loops on your hook. You’ll have two loops remaining. This is the halfway point of completing a double crochet stitch.
Step 6: Yarn Over, Pull Through the Last Two Loops
Yarn over one final time, then pull through the remaining two loops. Just one loop should remain on your hook. Congratulations—you’ve completed your first double crochet stitch!
Step 7: Repeat Across the Row
Continue repeating Steps 2–6, making one double crochet in each chain stitch across the row. At the end, your final stitch should go into the top of the turning chain from the previous row. If working from a foundation chain, work into the last chain.
Starting Row 2: The Turning Chain
After completing your first row, start the next one as follows:
-
Chain 3: This is called the turning chain. Its purpose is to bring your hook up to the height of a double crochet stitch. In most patterns, these three chains count as your first dc of the new row.
-
Turn your work: Flip your piece over so you’re looking at the back. The wrong side is now facing you.
-
Skip the first stitch: Since the chain-3 already counts as your first stitch, skip the very first stitch (the one right below the turning chain). Then yarn over and insert your hook into the next stitch to begin working across.
-
Work across: Double crochet into each stitch, including the top of the turning chain at the very end. Skipping that last stitch is one of the most common beginner mistakes—always work into the turning chain to keep your edges straight.
Key tip: Count your stitches at the end of each row. If you started with 12 dc and consistently keep 12 in every row, your edges will stay perfectly straight.
Common Mistakes (And How to Fix Them)
| Mistake | Fix |
|---|---|
| Curved or uneven edges | You’re losing or adding stitches. Always work into the top of the turning chain at the end of each row and skip the first stitch after the chain-3 at the beginning. |
| Stitches too tight | Switch to a larger hook or loosen your tension slightly. |
| Stitches too loose | Try a smaller hook or tighten your yarn hand grip. |
| Using the wrong placement | Always insert your hook under both top loops of the “V” unless a pattern says otherwise. Working into only one loop changes the texture. |
| Confusing US and UK terms | Double crochet (US) = treble crochet (UK). Triple crochet (US) = double treble crochet (UK). Double-check which system your pattern uses. |
How to Double Crochet in the Round
Once you’re comfortable working in rows, try double crocheting in the round. This is essential for hats, bags, and amigurumi-style projects:
-
Create a ring: Chain the desired length, then join the last chain to the first with a slip stitch to form a ring. Alternatively, use a magic ring for an adjustable center.
-
Chain 3: This turning chain counts as your first dc of the round.
-
Work into the center: Insert your hook into the center of the ring (not into individual chain stitches). Yarn over, pull up a loop, and complete the dc as usual.
-
Continue around: Work the number of dc stitches your pattern requires into the ring. When you reach the end of the round, slip stitch into the top of the starting chain-3 to join.
For subsequent rounds, chain 3, then work one dc into each stitch from the previous round and join with a slip stitch at the end.
Patterns That Use Double Crochet
Double crochet is incredibly versatile. You’ll find it in patterns for:
-
Blankets and afghans
-
Sweaters and cardigans
-
Scarves, shawls, and wraps
-
Hats and beanies
-
Bags and totes
-
Granny squares (this stitch is the backbone of the classic granny square)
-
Lacy or openwork designs
Patterns that don’t use double crochet include amigurumi (stuffed toys) and baskets, which require the tighter, denser fabric of single crochet.
Double Crochet vs. Single Crochet
Understanding the difference between these two foundational stitches is important for reading patterns:
| Feature | Single Crochet (sc) | Double Crochet (dc) |
|---|---|---|
| Height | Short (1 chain tall) | Tall (3 chains tall) |
| Fabric Texture | Dense, tight | Airy, flexible |
| Speed | Slower to build rows | Works up faster |
| Best For | Amigurumi, dishcloths, sturdy items | Blankets, garments, shawls |
| Stitch Count | 1 yarn over total | 3 yarn overs total |
Using both stitches in one project creates contrast and texture. Many patterns combine single and double crochet for visual interest.
Frequently Asked Questions
Q: What if my edges aren’t straight?
A: Uneven edges are usually caused by adding or skipping stitches at the start or end of rows. Make sure you work into the top of the turning chain at the end of each row, and skip the first stitch after your chain-3 when starting a new row.
Q: What’s the best yarn for practicing double crochet?
A: A smooth, light-colored, medium (worsted) weight acrylic yarn in a solid color. Acrylic is inexpensive, soft, and easy to frog (rip out) if you make a mistake. Avoid dark, fuzzy, or variegated yarns while learning.
Q: How many chains do I need to start?
A: For practice, chain 15–20 stitches. Add 3 extra for your turning chain, making 18–23 chains total. Insert your hook into the 4th chain from the hook (the first 3 chains count as your first dc).
Q: How do I increase or decrease in double crochet?
A: To increase, simply work two dc stitches into the same stitch from the previous row. To decrease (dc2tog), yarn over, insert hook, pull up a loop, yarn over, pull through two (2 loops on hook), yarn over, insert into next stitch, pull up a loop, yarn over, pull through two (3 loops on hook), yarn over, pull through all three.
Q: What does dc2tog mean in a pattern?
A: “dc2tog” means “double crochet two together”—a decrease that combines two stitches into one. It’s used to shape projects like hat crowns and garment necklines.
Q: Can I use double crochet for a scarf?
A: Absolutely! Double crochet makes a beautifully drapey, quick-to-work scarf fabric that’s perfect for beginners.
Helpful Tips for Success
-
Count your stitches after every row. This habit will save you from discovering uneven edges several rows later.
-
Keep your tension consistent. If your stitches look uneven, focus on keeping the same tightness for each yarn over and pull-through.
-
Practice with a swatch first. Before starting a full project, crochet a small 4×4 inch swatch to get comfortable with the stitch and check your gauge.
-
Use stitch markers. Place one at the beginning of each row so you can easily identify the turning chain.
-
Watch for the “V.” Each completed stitch has a neat “V” shape at the top. Inserting under both loops of that V ensures your stitches look consistent.
Ready to Practice?
Double crochet is one of those stitches that opens up a whole world of crochet possibilities. Once you’ve got it down, you can tackle granny squares, lacy shawls, oversized sweaters, and so much more. The key is repetition—chain up a small swatch and work rows until the motion feels natural.